Wednesday, December 14, 2011


Break Time
I was early for a prenuptial session shoot with one of my photo mentors when walking around and shooting some images for infrared photography came to mind to put valuable time into good use. Knowing I would have to come back to be in time for the pre-nuptial session, I decided to use an ‘infrared digital camera’ owned and self-converted by another mentor.
The next half-hour was not put to a waste but proved to be very productive instead . I clicked a few shots until I came to a certain spot. It was just a few minutes past mid-noon and the light was perfect for infrared photography. There was one particular image I loved.
The colors of the foliage were outstanding due to the heat and the light of the midday sun. I was very happy with the outcome but I know there might be a way to improve it.
Nikon D70 (converted camera) with an 18-55 kitlens, f/9, 1/500s., ISO 400 12:49 p.m. (Click on image to enlarge)
I had enough and started walking back to the assembly for the afternoon photo session.
We spent almost an hour and a half shooting the engagement session when we past by the same spot where I was shooting for infrared previously! The light was not that bright and it was almost three in the afternoon. However, I noticed that there was this tractor beneath one of the trees. I immediately grabbed the converted camera again and got a frame.
The colors were not very striking but I suppose this second shot of the same place might be more effective with the tractor. Upon arriving home later, I started processing the images and indeed, the second image with a tractor proved to be more appealing, at least for me.
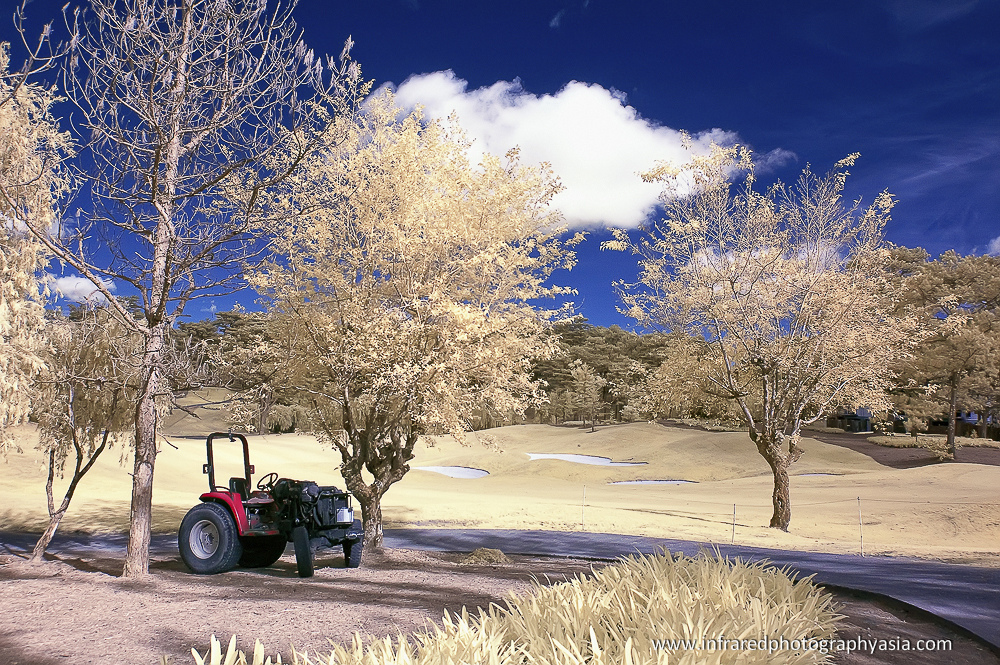

Break Time.Nikon D70 (converted) with an 18-55 kitlens, f/7.1, 1/800s., ISO 400 2:41 p.m.  (Click on image to enlarge)
More often than not, you need to go back to a certain place several times (for some, in a span of months or years) until you get the shot you need.


Sunday, November 13, 2011

Output: Infrared Filters vs. Converted IR Camera


Here are some images taken with a converted camera, compared to ones using a filter.  Please take note that these photos are very subjective and may have varying output.  We included these here for purposes of comparison.


The first image: Converted Camera Nikon D70
Nikon D70, 18-55 Kitlens @18mm., f/7.1, 1/800 sec., ISO 400, +0.3 step


The second image: Unconverted Nikon D90 
Nikon D90, 18-55 Kitlens @18mm, f/11, 30 secs., ISO 200, Hoya R72 Infrared Filter


Third image: Converted Camera Nikon D70 
Nikon D70, 18-55 Kitlens @18mm, f/7.1, 1/1600 sec., ISO 400


Fourth image: this is how it may look with a filter. Unconverted Nikon D90 
Nikon D90, 18-55 Kitlens @18mm, f/8, 30 secs., ISO 200, Hoya R72 Infrared Filter


Converted infrared cameras are best for travel where time to set up a tripod and waiting for exposure is almost impossible. The use of infrared filters brings out dynamism with streaking clouds and moving foliage due to the longer exposure. Each system has its own strength and weaknesses and works best for particular situations.


Friday, October 07, 2011


Using Infrared Filters vs. Converted Digital Cameras


Shooting Infrared Images requires you to have a camera at hand.  You can either go for an unconverted digital camera and use an Infrared Filter (Eg. Hoya R72); or shoot with a converted camera for IR.

FILTERS
Many infrared photographers use filters as converting a camera can be a little pricey.  The most popular is the Hoya R72 Infrared filter.  Using a lens filter will require you to use a tripod as capture time may be proven to be longer than normal. I currently use a Nikon system and based on experience, infrared lens filters work well with older cameras (such as the Nikon D70, D70s, D40) as these cameras have 'weaker' infra cut-off filters inside them which makes them great for infrared photography.  Filters also work pretty well with Nikon D200, D300, D300s and D700.  These filters may also work with other newer models but might take longer exposure times and therefore may not be always ideal.  A great lens to use for infrared is the Nikkor 18-55 kitlens (VR or non VR model).  These are the cheap plastic lenses that comes with most DX format cameras in the Nikon end. The Nikkor 12-24 wide angle DX lens also works as well as the newer Nikkor 10-24 Dx.  The Sigma 10-24 proves to be a cheaper alternative to this.  For FX format (Nikon D700), the Nikkor 20mm f/2.8 lens is a good lens to start with.

Advantages of using filters:
1. You can save on money from converting your camera and you can always use your camera for other purposes aside from infrared photography.
2. You get dynamic landscapes and scenes due to the delayed exposure (eg. streaking clouds and moving waves or water).
Disadvantages:
1. Longer exposure times and a strong sunlight is needed to capture great images.  (Ideal time to shoot infrared images would be at midday-anytime from 11:30 am to 1pm- when the sun is up and really hot.  Be wary of burning your skin).
2. Filters do not work for all models of cameras and lenses.

Camiguin Island (2011). Taken using a Nikon D70s, 11-16 Tokina lens and R72 Infrared Hoya filter. Take note that the 11-16 Tokina lens may not be always ideal for using with infrared filters. A Nikkor 18-55 kit lens would have more superb results even more if you wish to come out with false color images.


CONVERTED CAMERAS
The other way of shooting infrared images is by use of converted cameras.  Shooting with a converted camera is a lot easier but you have to customize your camera by removing the in-camera cut-off filter and replacing it with an infrared sensitive infra filter.  There are many companies doing this for a fee.  Using a converted camera would not require you to expose images for longer periods but would allow you to use your camera “just as if there were no filters attached to the lens”.  Shooting outside the midday hours can also be possible when using these cameras.
Advantages:
1. Easier shooting
2. You may shoot before, during and after midday as long as the sun is up.
Disadvantages:
1. No streaking clouds or moving water (not so dynamic).
2. Bit expensive for the fact that you will have to convert and would not be able to use your converted camera for  purposes other than infrared photography.
Mt. Pinatubo, (2011). Taken with a converted Nikon D70 and a 20mm lens processed in Photoshop  

Monday, September 05, 2011


Welcome to the world of digital infrared photography!


Part of the fun in photography is trying new things. Digital IR photography helps you look at your world in a new way and lets you create otherworldly images that appear unlike those from any other technique you’re likely to try. That alone is a good enough reason to try digital infrared photography.
Bani, Pangasinan (2011).Nikon D70 (Unconverted); 11-16 Tokina Lens; Hoya R72 Infrared Filter (Click on image to enlarge)


What You Will NeedInformation, Equipment and Perseverance 

First, you will need information on how to shoot infrared images.  The rules in composing digital infrared images are pretty much the same as general photography.   In today's age of digital technology, the web can provide you vast resources of materials for learning about infrared photography. You will find bits of information from this blog. The are also books and magazine articles on the topic.  Of course, you will need to gather as much information as you can to help you develop a particular style for your infrared photography.   

You will also need to have a digital camera which is sensitive to infrared light.  Other infrared photography shooters prefer to use a converted camera customized to shoot infrared images.  These are cameras fitted with an infrared sensitive filter inside their bodies.  Most modern digital cameras have an infrared and ultraviolet blocking filter inside them to help them produce sharper images.  In converted cameras, these blocking filters are removed and replaced by an infrared-pass filter which allows more infrared light to enter into the camera sensor thereby making the camera more sensitive to infrared light.  Once the camera is converted for infrared, you would not be able to use your camera for normal photography again unless you have it reverted back by removing the infrared-pass filter and returning the infrared blocking filter inside the camera body.  

If you opt not to use a converted camera,  an infrared optical filter will be necessary and is a cheaper option.  The most popular is the Hoya R72 Infrared filter, which was used to take the photo above.  Other accessories needed will be your tripod, and perhaps a shutter release cable.  To top this all, you will need patience and perseverance (lots of this) to be able to come out with stunning images worth keeping and sharing for the years to come.  Infrared photography might be challenging and frustrating when starting to try it.  However, once you get the hang of it, it will be enjoyable and will help build up your photography repertoire.


Thursday, September 01, 2011


Welcome to Infrared Photography Asia!
This site is where you can read about the rudiments of Infrared Digital Photography (a.k.a. Near-Infrared Photography). We wish to share practical tips to help you create stunning infrared images. Of course, things we share here are not absolutes but conglomeration of experiences in our journey of capturing invisible light.  There are many ways on how to come out with great infrared images.  We hope that you will get few tips from us.

Burgos, Ilocos Norte (2011). Nikon D70s uncoverted. 18-55 mm. kitlens, R72 Hoya Filter, 18mm., f/22, 10 secs., ISO 200